Crazy 8s is a recreational after-school math club that is available for library use. The creators call it “math gone wild, nothing like your usual math club!” Click here for more details on Crazy 8s.
Here’s the outline of Crazy 8s’ “Let’s Get Loud” program, which is aimed at children in 3rd-5th grades:
The Big Idea
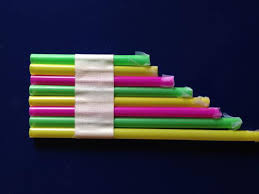
You’ll use water and straws to generate different sounds, then make a pan flute out of milkshake straws. Finally, you get to yell into a decibel meter to find out how loud you can be — using math the whole time to create funky music.
Supplies
Bedtime Math provides
- Milkshake straws (9 per child)
- Measuring tapes (1 per child)
You provide:
- Scissors (1 per child)
- Markers (1 per child)
- Rolls of masking tape
- Paper or plastic cups (1 per child; half-filled with water to start)
- Free sound meter app for a smart phone or computer (e.g. Decibel 10th for iPhone)
- Free keyboard/piano app (for bonus)
Key Prep
- Fill 1 paper or plastic cup for each child halfway with water.
- Maker your own pan flute ahead of time to use as an example during the activity.
What’s the Math
- Measuring length
- Comparing and sequencing lengths
- Simple relationships between variables
Kickoff
Intro: Did you know that no one can hear you yell in outer space? That’s because there’s no air! When we make sound, we’re actually rippling the air into waves. Today we’re going to test two math ideas about sound — the pitch, or how high or low a sound is; and the volume, how loud it is.
A Watery Whistle (5 minutes)
Intro to the kids: The strings or pipes of a xylophone or a guitar play different musical notes because they’re different lengths. We can see how this works with a milkshake straw and a cup of water.
- Have each child take 1 full-length straw and practice blowing across the top of the straw, rather than through it.
- Have each child put a straw into his/her half-filled cup.
- Tell the kids to blow across the top of the straw as they move it up and down in the water.
Ask the kids: What happens to the sound? Why? How does the length of the straw relate to the pitch (high or low notes)?
Bonus questions (optional): Why does this happen? (Shorter pieces produce sounds with shorter wavelengths, which are higher in pitch)
Have everyone drink or pour out the water to prepare for the next activity.
Be the Pied Piper (25 minutes)
 Intro: Now we’re going to use this idea to make our own pan flutes!
- Hand each child 8 straws, a measuring tape, a marker, and scissors.
- Using a measuring tape, each child measures and marks his/her 8 straws with a line at the following lengths (1 measurement per straw)
- 9 inches
- 8 inches
- 7 1/8 inches
- 6 3/4 inches
- 6 inches
- 5 3/8 inches
- 4 3/4 inches
- 4 1/2 inches
- Kids draw an X on the part of each straw past the marking. This is the piece they will throw away.
- Kids should cut each straw at the line they drew and put their completed flute pieces into their cups to keep track of them.
- The kids test the sounds of their straws: They hold each straw with one end pointing up and blow gently across the top.
Ask the kids: Do the straws sound the same? Which straws made higher notes?
- Using masking tape, kids should tape over one of each straw so no air can escape.
Ask the kids: How does the sound change when you cover one end? (It drops by one octave.)
- After taping the ends, have the kids put the straws in order of length, from longest to shortest, with the shortest on the left.
- The top open ends should all be lined up.
- Help the kids tape across the straws to hold them together.
- Now the kids blow across the top to make music.
Ask the kids: How does the sound change according to straw length? (Shorter straws make higher notes.) In math, the way two or more things change with each other — like the pitch and the length of the straw — is called their correlation. When the temperature rises, what else goes up? (e.g. thirst, the desire to go swimming) What does down (we wear fewer clothes)
Bonus (optional): If you have tuned instrument handy (guitar, keyboard, smartphone app), you can experiment to find out what notes the kids’ pan flutes play. they can then label the notes on the tape.
Be Loud (15 minutes)
Intro: Did you know that you can use numbers to measure noise? Sound is measured in decibels. Let’s use a sound meter to find out how loud you are!
 Roll out 10 feet on a measuring tape, lock it, and place it on the floor. Kids gather at one end of the 10-foot tape, while you stand at the other.
- Open up one of the suggested free sound-meter apps.
- The musicians play their flutes one at a time, 10 feet away from your sound meter. Watch and compare the meter readings.
- Now try voices. Kids take turns standing 10 feet from the meter and talking, while a partner watches the meter to see the range of readings and the peak sound.
- Then, one volunteer holds a long, loud note on “ah.” Everyone notes the decibel level.
- Then the hollerer walks toward the meter while holding that loud note.
- See if the next yeller can get louder. Note: Encourage them not to screech — they actually be louder if they “belt” instead.
Ask the kids: What happened to the decibel readings as people go closer? Unlike an inch, which is always the same amount, decibels change with distance for the same sound: They drop as you stand farther from the noise, and rise as you stand closer.
Cool fact: When you go up 10 decibels, you double the loudness!
A Touch of Class
Intro: Did you ever realize there is so much math in music — and that it’s just like the math you use in class? Your text books might ask
- Which is longer, 1/8 inch of 1/2 inch?
- If you have 3/4 inch and cut off 1/4 inch, what’s left?
Kids can take home their pan flutes to explore music and math even more.
— Emily Trezza, West Hempstead Public Library

 edWeb.net, a professional social and learning network for early childhood educators, is offering a free webinar entitled “Amazing Science Experiences on a Shoestring Budget.”


 We used a smartboard to show the online Snowflake Bentley by Jacqueline Briggs Martin. After the reading, we talked about snow crystals and how they form. We mixed Epsom salts and water (1 part salts to 2 parts hot water in a cup) to make “ice-crystal paint.” The kids used this paint to make designs on black construction paper. As the paint dries, the crystals form. The kids viewed crystals in the book for ideas on how to create their own. We also looked up paper snowflakes and made them as well.
 This fun design/build exercise teaches some simple but profound lessons in collaboration, innovation, hidden assumptions, and creativity that are central to the engineering process.
 Marilyn Burns, a mathematics educator and the founder of Math Solutions, leads a webinar on mixing story times with math. In this webinar, she shares how she uses books to introduce math topics, stimulate problem solving, and develop students’ reasoning and thinking skills. Scholastic will let you watch a reply of this webinar at any time.